Learn To Program Your Own Tools: Part 1
Thursday, February 17, 2022
While the main focus of my blog is to provide insights into things that I find interesting, I hope that one thing is clear with my works. That you have the ability to do just about anything yourself. And that holds true for just about anything, from writing to video production to even coding.
And that is what we will be doing today, exploring how any one can get up and running easily with coding. What we're gonna do today is get set up with the Rust programming language, and build a small GUI tool to convert unit measurements. One of the reasons I think the average Joe should learn how to code is because it's the tools of our modern times. Programming languages are to today like what hammers and drills were during the industrial revolution. It will do nothing but benefit someone to learn how to code, so let's get started!
Gathering Our Tools
Just like with simple tools we use in an office setting, a stapler, a chair, etc, we need to have a means to build our tools. Staplers don't grow on trees, and neither do programs. We're going to be using two main tools in order to build our program: a compiler and an Integrated Development Environment (IDE).
The compiler will take the code we've written and translate it to a machine code executable, enabling us to run our program. The IDE is a special kind of text editor that highlights different code syntax, provides insight into possible errors, and in some cases contains a compiler.
The compiler we will use is cargo, which is a package manager for the rust programming language. Now you might ask why we are going to utilize rust as opposed to other programming languages like Python or C/C++. One thing I have come to like about rust is that it is written in a high level way like python, but still provides the low level control that can be found in C/C++. That, and it is very memory safe, and will do it's best to prevent you from shooting yourself in the foot when programming.
Now, to install cargo and the rust tool chain all you have to do is go to the Rust Lang Website, and go to the Getting Started page. From there it will give you a command to run on your computer's command prompt depending on what OS you are running. There are also other methods to install the tool chain if you aren't yet comfortable with the command line.
Next let's grab our IDE. The most commonly used one is Microsoft's own Visual Studio Code. It is fully cross platform so it will work on any desktop or laptop computer. The install instructions will vary depending on your OS, but it should be as straight forward as installing any other piece of software.
Setting Up The Tools
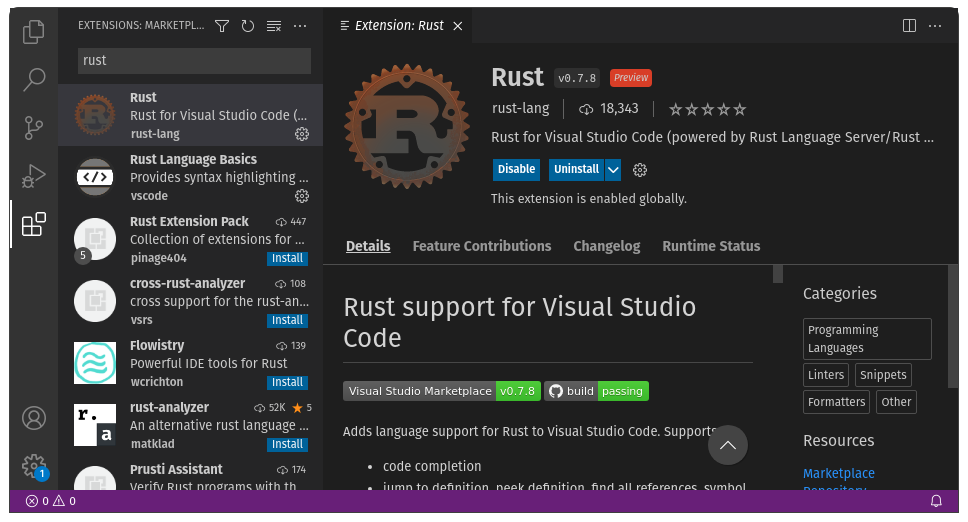
Once you have cargo and VS Code installed, we need a way for them to work together to give us the most benefit. In VS Code, you'll want to open the extensions. That's the icon on the left sidebar with 4 squares. In the text box that says Search Extensions in Marketplace, we will type in rust. The top result should be an extension called Rust by rust-lang. Go ahead and enable this extension (see screenshot below if you aren't sure).
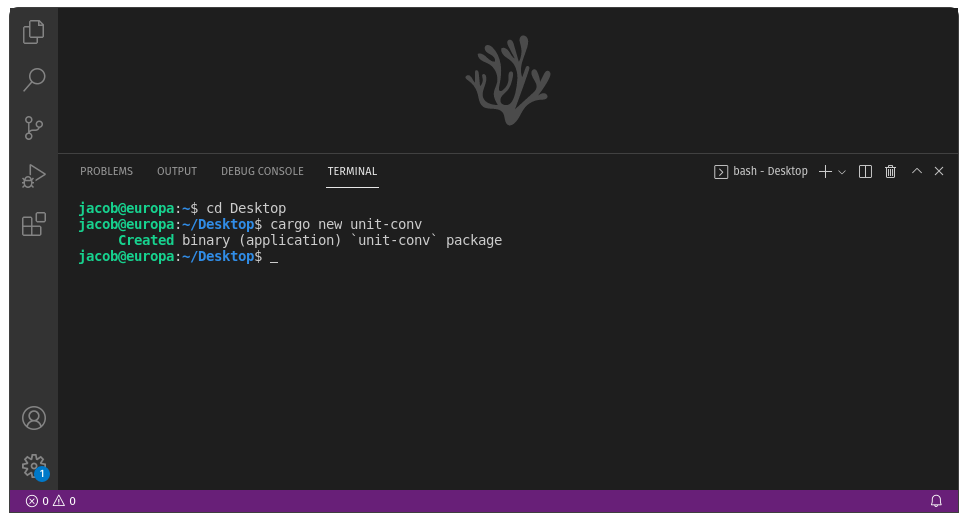
Next we will need to set up our development folder. Thankfully cargo makes this very easy. In VS Code, press the CTRL and the ~ key to open up the command prompt window. By default the command prompt will drop us in our "Home" folder, or where our Documents, Pictures, etc, folders reside. We are going to move to the desktop by entering cd Desktop into the command prompt.
Now, we will create the project folder. On the command prompt, type in cargo new unit-conv. This will create a folder that holds all of our project files.
Now we will press CTRL and K, and then CTRL and O to bring up the open folder dialog. Navigate to the project folder we just created, then press open. VS Code will ask to download additional components for the rust compiler extension, allow it to do so. After that we are all set up and can begin coding!
Coding The First Project
Now we are ready to code, almost. You'll notice some files and folders already in the project folder when we open it in VS Code. There will be a folder called src, that is where the source code of our project will all be held. Next is a file called Cargo.toml. This is a text file that will hold all the project information. We'll touch on that in a little bit. Next is a file called .gitignore. This one isn't important to us today, but it is a file that lists all the folders/files that we want our source control to ignore when uploading to a git repository. We won't cover that today so we can ignore it for now.
Let's open up the file src/main.rs. It should just have three lines of code, just like below.
fn main() {
    println!("Hello, world!");
}
The first line is a function declaration. Functions are ways to group lines of code together, so we don't have to write them over and over again. This specific function is the main function. without a main function, the program will not know where to begin executing our lines of code and will fail to compile. The empty parenthesis () tell the compiler that no arguments will be needed to run the program. There are situations where we will put things in here, but right now we won't worry about it. The open bracket { lets the compiler know the following lines of code are all a part of the main function.
On the next line we have println!("Hello, world!");. This is an example of how we would call a function. The function being called is println! and the argument given is "Hello, world!". We will end every line of code execution with a semicolon, ;. There are some exceptions to this rule which we will get to later.
The last line in this example program is a closing bracket, }. It lets the compiler know that the main function is complete.
Now we will run this program. Press the CTRL and ~ keys to bring up the command prompt. It will bring it up in the project directory, so need to cd anywhere else. Type in the command cargo run to build (compile an executable) and run the program. The output should look something like below.
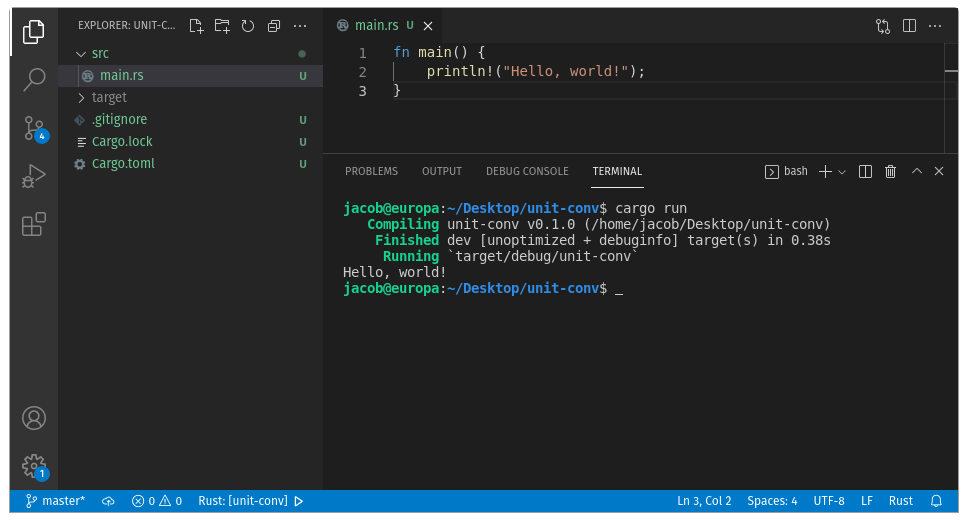
As you can see, all the program did was print the text Hello, world! to the console output. The function println! is one that is built into rust, and available to use right out of the box. But how do we make our own functions? Well that part is pretty simple.
Creating Custom Functions
So when we looked at how a basic function like main was set up, we saw that it did not take in any arguments. Now let's make a function that does. The code below is an example of a basic function that takes in one argument.
fn main() {
    say_hello("Jacob");
}

fn say_hello(s: &str) {
    println!("Hello, {}!", s);
}
As you can see we made a new function named say_hello that takes in one argument. Arguments can be thought of as inputs that can and will change depending on how they are used. Another name for these arguments are variables. Variables in programming terms are pieces of information that can vary depending on how they are used. In our function, we defined a variable s as an argument for our function. The : &str bit just tells the compiler what type of variable we will need, whether it be an integer, a decimal number, a text character, or a string of characters. &str refers to a pointer to a text string variable. A pointer is literally pointing to the memory slot on the computer RAM that the value is held in. Because our text input is unknown to us while making the function, we use a pointer to keep it a little open ended.
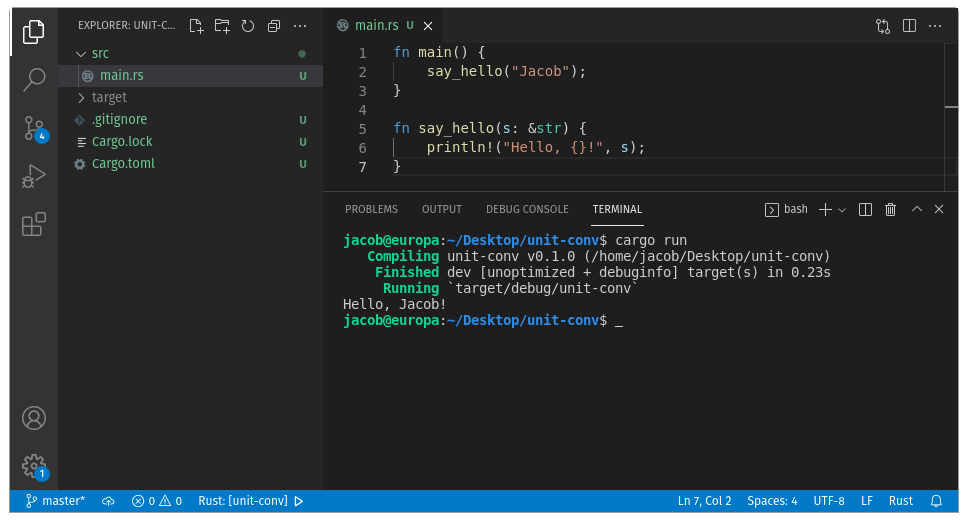
Next we have that println! command again, this time with two arguments that are separated by a comma. The text string, Hello, {}! and our argument variable s. When we compile this program, the output will be Hello, (insert value of s here)!. Because we use that function in main with the argument "Jacob", the output looks like the following:
Now let's make another function, this time one that returns a value. Let's add on to our program:
use std::io;

fn main() {
    let name = get_name();
    say_hello(name.as_str());
}

fn say_hello(s: &str) {
    println!("Hello, {}!", s);
}

fn get_name() -> String {
    let mut name = String::new();

    println!("What is your name?");

    io::stdin().read_line(&mut name).expect("Error reading from stdin.");

    name
}
Now there's a lot to unpack here, so let's start from the first line. use std::io;. This line is bringing a precompiled code library into scope for us to use. A software library is a set of functions that have already been written that we can use to make our lives easier. Think of it as a tool box, we wouldn't build a new hammer every time we needed one on a project, so we get one we already have from a tool box to use.
Now let's look at the declaration of our new function. fn get_name() -> String. This is a typical function call out, with something new. The -> String portion of this declaration tells the compiler that when the function is called, a variable of type String will be returned. So in the top of our program, where we have the line let name = get_name(); we just created the variable name with the value that is returned from the get_name function.
Now you probably noted that we have both &str and now String variable types. One is a pointer to the value's location in the RAM memory, and the other is the data itself. That's my brief understanding, hopefully someone much more knowledgeable will let me know if this is correct or not and I will update accordingly.
So, in the get_name function we will do a few things. We define a variable name for the scope of the get_name function, one that is separate from the name variable in the scope of the main function. Note that we put a keyword, mut after our let in the get_name function. That is to make this variable mutable, which lets us change the value of that variable without having to re assign it outright. In the main function, we leave name as immutable, since once it's defined we won't be changing it. In get_name we assign the variable name as String::new(). This tells the compiler we want an empty variable of type String. We will fill in the variable later.
Next we will be printing a query to the console output, and then we will have this line: io::stdin().read_line(&mut name).expect("Error reading from stdin.");. Now there's a lot to this line so we'll go through it piece by piece. io::stdin() is a tool from the std::io library we imported at the top of our program. The .read_line(&mut name) piece is the tool from stdin() that reads what the user types, and adds it to the end of the name variable string. The .expect("Error reading from stdin."); piece tells the compiler that in the event the computer can't read the input from the console, error out and spit out the string of text Error reading from stdin. You'll notice we need this for the program to not error out on compile, this is because the read_line() function returns either an Ok or Err value. They expect() piece handles this return.
Now we have the last line of our function, name. Notice that we do not have the semicolon on this line, this is because we are telling the compiler to return the value of the variable name for when the function is called.
When our entire program is compiled and run, the output should look like the below:
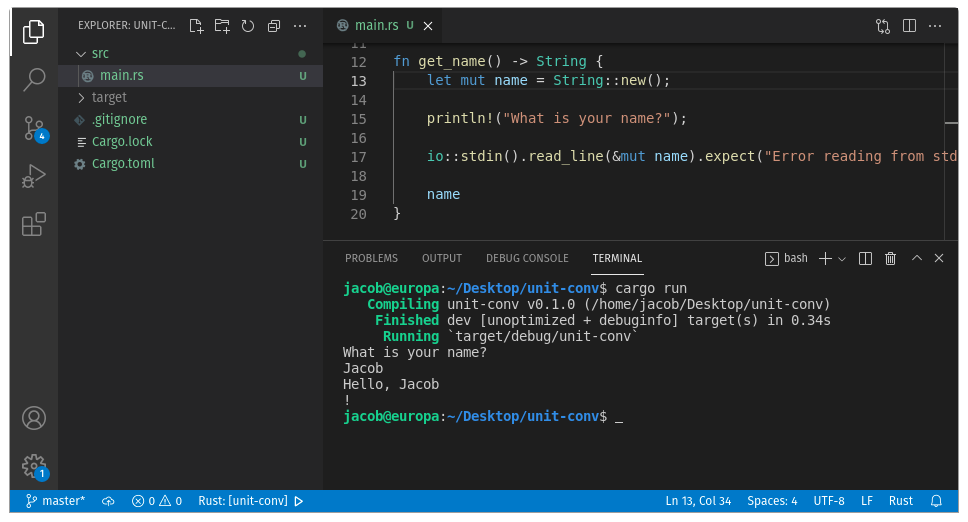
Note that the ! is on a separate line, that is because the read_line function captures when we press the enter key and adds it to the name variable. There's ways to fix this, but we won't worry too much about it for now.
Next Steps
So this blog post is getting a little long, so I'll cut it off here for now. Did you like taking the time to dive into rust? Do you want to see a part 2 or part 3 where we make a simple unit converter with a fully usable graphic user interface? Let me know and I'll be more than happy to keep this project going.
Thanks, Jacob